1. 설치
dependencies:
  flutter_kakao_login: ^3.4.0
2. 앱 추가
https://developers.kakao.com/console/app
카카오계정 로그인
여기를 눌러 링크를 확인하세요.
accounts.kakao.com
3. 앱 키 정보 저장.

4. 플랫폼 설정 (안드로이드를 기준으로 설명. iOS는 맨 아래로.)


이제 5번부터는 여기 따라한 내용임 : https://developers.kakao.com/docs/latest/ko/getting-started/sdk-android#add-key-hash
5. build.gradle(android/app 말고 그냥 android/ 위치에 있는 것.)

+
dependencies {
	...
    classpath 'com.android.tools.build:gradle:3.6.1'
}
6. 필요한 모듈 설정하기.
build.gradle(이번에는 android/app 밑에 있는 module)
implementation "com.kakao.sdk:v2-user:2.7.0" // 카카오 로그인
위치는 여기 ↓

6.5 gradle 버젼 세팅
- 파일 위치: android/gradle.wrapper/gradle-wrapper.properties
distributionUrl=https\://services.gradle.org/distributions/gradle-5.6.4-all.zip
7. 인터넷 사용 권한 설정 & 기타 설정
7-1. proguard-kakao.pro 파일 생성
파일 위치: android/app/proguard-kakao.pro
파일 내용:
# kakao login
-keep class com.kakao.sdk.**.model.* { <fields>; }
-keep class * extends com.google.gson.TypeAdapter
7-2. build.gradle 파일 수정
- 파일 위치: android/app/build.gradle
buildTypes {
    release {
        ...
        proguardFiles 'proguard-kakao.pro'
    }
}
7-3. android/app/src/main/AndroidManifest.xml 수정
<!-- 1. Setup Require -->
<uses-permission android:name="android.permission.INTERNET" />

<application>
    <activity
        ...
        android:name="....">
        <intent-filter>
            ...
        </intent-filter>
    </activity>

    <!-- 2. Setup Kakao -->
    <activity android:name="com.kakao.sdk.auth.AuthCodeHandlerActivity">
        <intent-filter>
            <action android:name="android.intent.action.VIEW" />
            <category android:name="android.intent.category.DEFAULT" />
            <category android:name="android.intent.category.BROWSABLE" />

            <!-- Redirect URI: "kakao{NATIVE_APP_KEY}://oauth“ -->
            <data android:host="oauth"
                android:scheme="kakao{여러분의NATIVE_APP_KEY}" />
			<!-- ex) android:scheme="kakao0123456789abcdefghijklmn" /> -->

        </intent-filter>
    </activity>
    ...
</application>
8. key 해시를 등록해야 함.
일단 아래 페이지에 디버그 키 및 릴리즈 키 구하는 법이 나와있는데, 👇
https://developers.kakao.com/docs/latest/ko/getting-started/sdk-android#add-key-hash
Kakao Developers
카카오 API를 활용하여 다양한 어플리케이션을 개발해보세요. 카카오 로그인, 메시지 보내기, 친구 API, 인공지능 API 등을 제공합니다.
developers.kakao.com
릴리즈 키 구하는 법을 잘 모르겠다면 아래를 따라하자
8 - 1. keystore 생성
http://dev-donghwan.tistory.com/79
[Android] Keystore 생성하기
1. Build -> Generate Signed Bundle / APK 2. Android App Bundle 또는 APK 선택 3. Create New 4. Key store path 설정 -> Password와 Password Confirm 입력 #Alias는 기억하기 쉽게 경로 설정에서 작성한..
dev-donghwan.tistory.com
8 - 2. releaseKey 생성
http://dev-donghwan.tistory.com/3
[Android] Hash Key (카카오 Api / 네이버 Api / 구글 Api)
2021-08-13 수정 Android에서 카카오, 네이버, 구글 Api를 연동할때, HashKey를 입력해 달라는 경우를 많이 볼 수 있습니다. 이런 경우 필요한 키의 종류는 Debug Key와 Release key가 있습니다. Debug Key와 Rel..
dev-donghwan.tistory.com
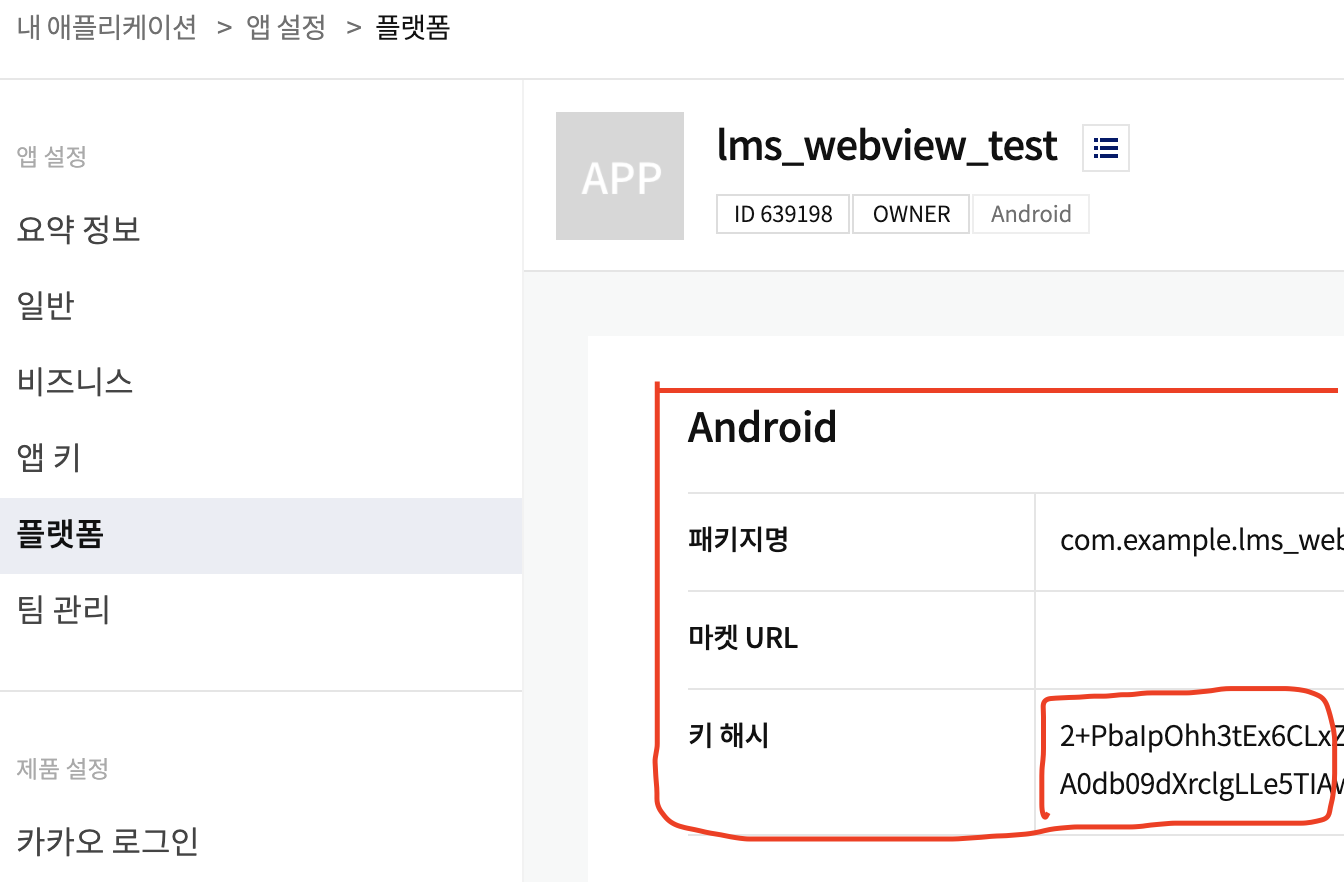
9. 내 애플리케이션 > 앱 설정 > 플랫폼에 등록한다.(디버그 키, 릴리즈 키 둘 다)
https://developers.kakao.com/console/app/639198/config/platform
10. 카카오 로그인 활성화

11. 클래스 시작 시점에 initState 작성
@override
  void initState() {
    super.initState();
    loadKakao();
  }
여기 위치⬇

loadKakao() 함수:
void loadKakao() async {
    // 카카오에서 받은 native app key
    await kakaoSignIn.init('980273fd8f32ef89773a87291945112a');

    // for 안드로이드
    final hashKey = await kakaoSignIn.hashKey;
    print('hashKey: $hashKey');
  }
12. 로그인 예제(맨 아래 함수부터 볼 것)
  void _updateAccessToken(String accessToken) {
    setState(() {
      _accessToken = accessToken;
    });
  }

  void _updateRefreshToken(String refreshToken) {
    setState(() {
      _refreshToken = refreshToken;
    });
  }

  void _updateAccountMessage(String message) {
    setState(() {
      _accountInfo = message;
    });
  }

  void _updateStateLogin(bool isLogined, KakaoLoginResult result) {
    setState(() {
      _isLogined = isLogined;
    });
    if (!isLogined) {
      _updateAccessToken('');
      _updateRefreshToken('');
      _updateAccountMessage('');
    } else {
      if (result.token != null && result.token!.accessToken != null) {
        _updateAccessToken(result.token!.accessToken!);
        _updateRefreshToken(result.token!.refreshToken!);
      }
    }
  }

  void _updateLoginMessage(String message) {
    setState(() {
      _loginMessage = message;
    });
  }

  void _processLoginResult(KakaoLoginResult result) {
    switch (result.status) {
      case KakaoLoginStatus.loggedIn:
        _updateLoginMessage('Logged In by the user.');
        _updateStateLogin(true, result);
        break;
      case KakaoLoginStatus.loggedOut:
        _updateLoginMessage('Logged In by the user.');
        _updateStateLogin(false, result);
        break;
      case KakaoLoginStatus.unlinked:
        _updateLoginMessage('Unlinked by the user');
        _updateStateLogin(false, result);
        break;
    }
  }

  Future<void> flutterKakaoLogin() async {
    try {
      final logInResult = await kakaoSignIn.logIn();
      _processLoginResult(logInResult);
    } on PlatformException catch (e) {
      print("${e.code} ${e.message}");
    }
  }
14. 로그아웃 예제(unlink 시 자동 로그아웃 됨)
  Future<void> _unlink() async {
    try {
      final result = await kakaoSignIn.unlink();
      _processLoginResult(result);
    } on PlatformException catch (e) {
      _updateLoginMessage('${e.code}: ${e.message}');
    }
  }
15. 전체 예제
class FlutterKakaoLoginView extends StatefulWidget {
  const FlutterKakaoLoginView({Key? key}) : super(key: key);

  @override
  _FlutterKakaoLoginViewState createState() => _FlutterKakaoLoginViewState();
}

class _FlutterKakaoLoginViewState extends State<FlutterKakaoLoginView> {
  static final FlutterKakaoLogin kakaoSignIn = FlutterKakaoLogin();
  bool _isLogined = false;
  String _accessToken = '';
  String _refreshToken = '';
  String _accountInfo = '';
  String _loginMessage = 'Not Logged In';

  @override
  void initState() {
    super.initState();
    loadKakao();
  }

  void loadKakao() async {
    // 카카오에서 받은 native app key
    await kakaoSignIn.init('980273fd8f32ef89773a87291945112a');

    // for 안드로이드
    final hashKey = await kakaoSignIn.hashKey;
    print('hashKey: $hashKey');
  }

  Future<void> flutterKakaoLogin() async {
    try {
      final logInResult = await kakaoSignIn.logIn();
      _processLoginResult(logInResult);
    } on PlatformException catch (e) {
      print("${e.code} ${e.message}");
    }
  }

  void _updateAccessToken(String accessToken) {
    setState(() {
      _accessToken = accessToken;
    });
  }

  void _updateRefreshToken(String refreshToken) {
    setState(() {
      _refreshToken = refreshToken;
    });
  }

  void _updateAccountMessage(String message) {
    setState(() {
      _accountInfo = message;
    });
  }

  void _updateStateLogin(bool isLogined, KakaoLoginResult result) {
    setState(() {
      _isLogined = isLogined;
    });
    if (!isLogined) {
      _updateAccessToken('');
      _updateRefreshToken('');
      _updateAccountMessage('');
    } else {
      if (result.token != null && result.token!.accessToken != null) {
        _updateAccessToken(result.token!.accessToken!);
        _updateRefreshToken(result.token!.refreshToken!);
      }
    }
  }

  void _updateLoginMessage(String message) {
    setState(() {
      _loginMessage = message;
    });
  }

  void _processLoginResult(KakaoLoginResult result) {
    switch (result.status) {
      case KakaoLoginStatus.loggedIn:
        _updateLoginMessage('Logged In by the user.');
        _updateStateLogin(true, result);
        break;
      case KakaoLoginStatus.loggedOut:
        _updateLoginMessage('Logged In by the user.');
        _updateStateLogin(false, result);
        break;
      case KakaoLoginStatus.unlinked:
        _updateLoginMessage('Unlinked by the user');
        _updateStateLogin(false, result);
        break;
    }
  }

  Future<void> _unlink() async {
    try {
      final result = await kakaoSignIn.unlink();
      _processLoginResult(result);
    } on PlatformException catch (e) {
      _updateLoginMessage('${e.code}: ${e.message}');
    }
  }

  @override
  Widget build(BuildContext context) {
    return Container(
        alignment: Alignment.center,
        color: Colors.white,
        child: Expanded(
          child: Column(
            crossAxisAlignment: CrossAxisAlignment.stretch,
            children: [
              Row(
                children: [
                  ElevatedButton(
                    child: Text('LogIn'),
                    onPressed: () {
                      flutterKakaoLogin();
                    },
                  ),
                  ElevatedButton(
                      onPressed: () {
                        _unlink();
                      },
                      child: Text('Log Out'))
                ],
              ),
              _isLogined
                  ? Text(
                      '로그인 되었습니다.',
                      style: TextStyle(fontSize: 18.0, color: Colors.black),
                    )
                  : Text('로그아웃 상태 ',
                      style: TextStyle(fontSize: 18.0, color: Colors.black)),
              Text(
                'access_token: $_accessToken',
                style: TextStyle(fontSize: 18.0, color: Colors.black),
              ),
              Text(
                'refresh_token: $_refreshToken',
                style: TextStyle(fontSize: 18.0, color: Colors.black),
              ),
              Text(
                'accountInfo: $_accountInfo',
                style: TextStyle(fontSize: 18.0, color: Colors.black),
              ),
              Text('loginMessage: $_loginMessage',
                  style: TextStyle(fontSize: 18.0, color: Colors.black)),
            ],
          ),
        ));
  }
}
4. 번부터 다시 iOS
5. 앱 등록. (패키지 이름만 하면 됨)

6. pod file 추가
터미널로 프로젝트 내 ios 폴더가 있는 곳으로 가기.
Podfile 열어서(vim Podfile) -> pod 'KakaoSDK' 추가

vim이라면 :wq 를 입력하여 저장후 나와서
pod install 로 KakaoSDK 설치.
7. info.plist 수정
pod 파일 설치했다면 해당 경로에서 open . 으로 해당 폴더에 들어감.(직접 찾아가도 됨)
그리고 .xcworkspace라고 적힌 파일 더블 클릭하여 xcode로 열어줌.
info.plist 우클릭 후 open as > source code
아래 추가.
7 - 1. 여러분의 API 키 추가.
<key>KAKAO_APP_KEY</key>
<string>여러분의 네이티브 API 키를 여기에</string>
7 - 2. 아래도 추가.
<key>LSApplicationQueriesSchemes</key>
<array>
    <string>여러분의 API키를 여기에</string>
    <string>kakaokompassauth</string>
    <string>storykompassauth</string>
    <string>kakaolink</string>
    <string>storylink</string>
</array>
<key>CFBundleURLTypes</key>
<array>
    <dict>
        <key>CFBundleTypeRole</key>
        <string>Editor</string>
        <key>CFBundleURLName</key>
        <string></string>
        <key>CFBundleURLSchemes</key>
        <array>
            <string>여러분의 API키를 여기에</string>
        </array>
    </dict>
</array>
8. 아래 참고하여 URL Schemes 설정

9. AppDelegate.swift 파일 수정
// 필자의 코드
import UIKit
import Flutter
import KakaoSDKCommon
import KakaoSDKAuth

@UIApplicationMain
@objc class AppDelegate: FlutterAppDelegate {
  override func application(
    _ application: UIApplication,
    didFinishLaunchingWithOptions launchOptions: [UIApplication.LaunchOptionsKey: Any]?
  ) -> Bool {
    GeneratedPluginRegistrant.register(with: self)

    // kakao start // 여기부분 그냥 주석처리해도 됨.
//    KakaoSDKCommon.initSDK(appKey: "여러분의 Native API 키")
    // kakao end
    return super.application(application, didFinishLaunchingWithOptions: launchOptions)
  }

    override func application(_ app: UIApplication, open url: URL, options: [UIApplication.OpenURLOptionsKey: Any] = [:]) -> Bool {
        if (AuthApi.isKakaoTalkLoginUrl(url)) {
            return AuthController.handleOpenUrl(url: url)
        }
        return false
    }
}
여기까지 했으면 일단 다 한건데 필자는 따로 여기서 xcode 메뉴 - product -build 까지 했음.
이제 위의 10번으로 돌아가기 !
# issue
아이폰에서 두 버튼의 간격이 너무 가까우면 로그아웃 시 로그인까지 같이 클릭돼서 로그아웃 후 로그인이라는 로직이 실행됨.
'flutter > Flutter 정보' 카테고리의 다른 글
| Flutter 2.0 웹뷰 - 네이티브 통신(WebView - Native) (0) | 2021.09.14 |
|---|---|
| Flutter 2.0 QR code 인식하기 (1) | 2021.09.13 |
| Flutter 2.0 권한 동의 얻어오기 (1) | 2021.09.13 |
| Flutter 2.0 웹뷰 (뒤로가기 기능까지!) (0) | 2021.09.13 |


최근댓글