Spring
framework = 틀
프레임워크가 있고 없고는 운전할 때 지도가 있고 없고의 차이.
지도가 없다면 다양한 루트로 목적지에 도달할 수 있지만,
지도가 있다면 하나의 루트로 목적지에 갈 수 있기 때문에 신경쓸 것 매우 많이 줄어듦.
모듈
- spring-core: 스프링의 핵심인 DI, IoC를 제공
- spring-aop: AOP구현 기능 제공
- spring-jdbc: 데이터베이스를 쉽게 다룰 수 있는 기능
- spring-tx: 트랜잭션
- spring-webmvc: mvc 패턴에 따라 개발할 수 있도록 기능 제공.
스프링 프레임워크에서 제공하고 있는 모듈을 사용하려면, 모듈에 대한 의존설정을 개발 프로젝트에 XML 파일 등을 이용해 개발자가 직접 하면 된다.
스프링에서 객체를 생성하고 조립하는 것이 컨테이너(Container)
컨테이너를 통해 생성된 객체를 빈(Bean)이라 부른다.
pom.xml
스프링은 많은 모듈을 제공한다.
그 중에 어떤 모듈을 가져올 지 정하는 파일이 pom.xml파일이다.
<!-- 기본 설정 -->
<project xmlns="http://maven.apache.org/POM/4.0.0" xmlns:xsi="http://www.w3.org/2001/XMLSchema-instance" xsi:schemaLocation="http://maven.apache.org/POM/4.0.0 https://maven.apache.org/xsd/maven-4.0.0.xsd">
  <modelVersion>4.0.0</modelVersion>
  <groupId>spring4</groupId>
  <artifactId>testPjt01</artifactId>
  <version>0.0.1-SNAPSHOT</version>

  <dependencies>

      <dependency>
          <groupId>org.springframework</groupId>
          <artifactId>spring-context</artifactId>
          <version>4.1.0.RELEASE</version>
      </dependency>
  </dependencies>


  <build>
      <plugins>
          <plugin>
              <artifactId>maven-compiler-plugin</artifactId>
              <version>3.1</version>
              <configuration>
                  <source>1.8</source>
                  <target>1.8</target>
                  <encoding>utf-8</encoding>
              </configuration>
          </plugin>
      </plugins>
  </build>
</project>
이후 pom.xml 우클릭 - maven - update project
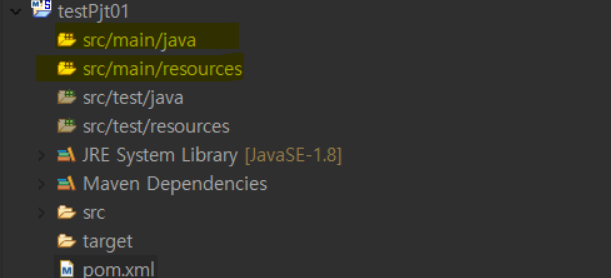
/src/main/java - .java파일 관리
/src/main/resources - 자원파일 관리(특히 스프링 설정 파일 .XML)
pom.xml은 메이븐 설정파일. 메이븐은 라이브러리를 연결해주는 역할.

프로젝트별로 필요한 라이브러리만 갖다 쓸 수 있게 해준다.
ApplicationContext
src/main/resources/ 밑에 applicationContext.xml 파일 추가.(이름 달라도 됨.)
ApplicationContext는 Spring Container가 Bean을 생성할 수 있도록 해줌.
기본틀: (거의 아래와 똑같이 씀.)
<beans xmlns="http://www.springframework.org/schema/beans"
    xmlns:xsi="http://www.w3.org/2001/XMLSchema-instance"
    xsi:schemaLocation="http://www.springframework.org/schema/beans
    http://www.springframework.org/schema/beans/spring-beans.xsd">

    <!-- 아래 한 줄만 해당 프로젝트에서만 쓸 코드 -->
    <bean id="tWalk" class="testPjt01.TransportationWalk"/>
</beans>
컨테이너 예제
먼저 TransportationWalk라는 클래스를 만들고, 해당 클래스 안에 move() 메서드를 만들어 둔 상태.
스프링 도입 전.
public class MainClass {

    public static void main(String[] args) {
        TransportationWalk transportationWalk = new TransportationWalk();
        transportationWalk.move();
    }
}
스프링 코드.
import org.springframework.context.support.GenericXmlApplicationContext;
public class MainClass {
public static void main(String[] args) {
//이전코드 TransportationWalk transportationWalk = new TransportationWalk();
// transportationWalk.move();
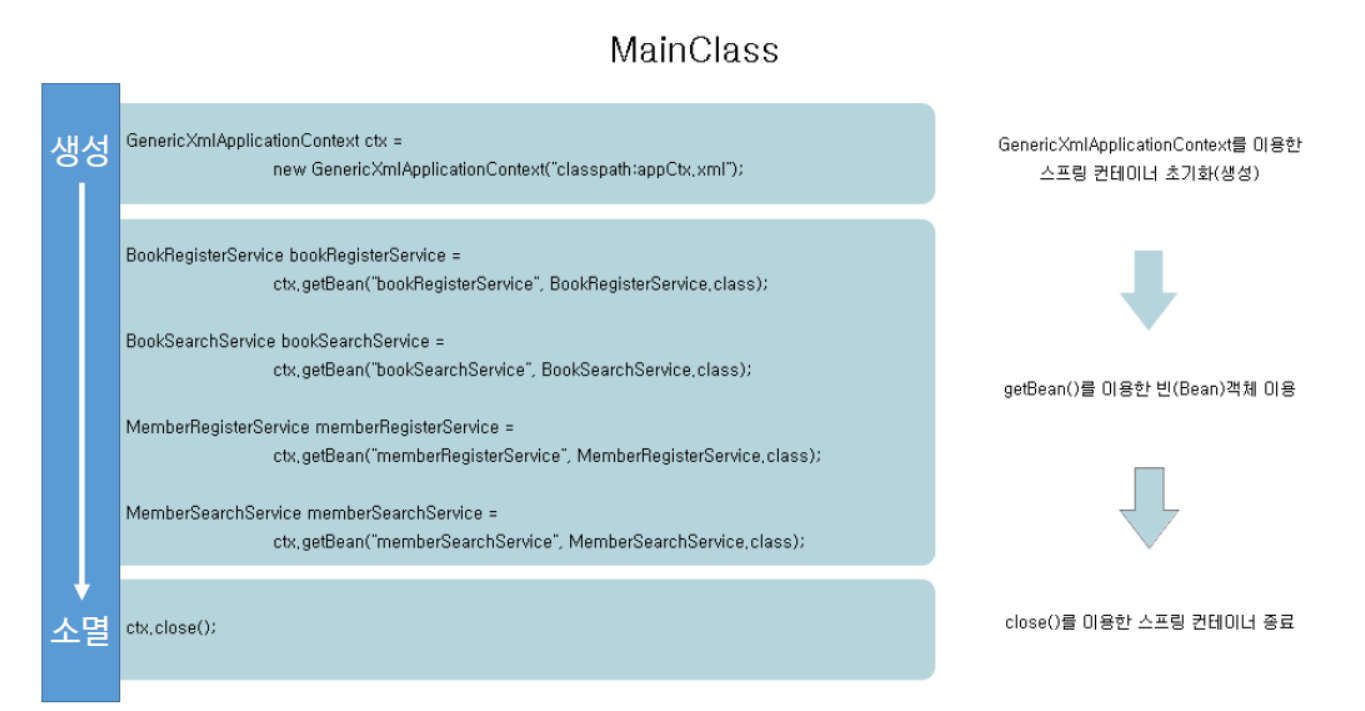
GenericXmlApplicationContext ctx
= new GenericXmlApplicationContext("classpath:applicationContext.xml");
TransportationWalk t = ctx.getBean("tWalk", TransportationWalk.class);
t.move();
ctx.close();
}
}
스프링에서는 먼저 applicationContext.xml이라는 파일 안에 객체를 생성할 방법을 정의해둔다.
그것을 컨테이너라고 하고, 그것에 의해 만들어진 객체를 bean이라고 한다.
이런 컨테이너에 접근하는 방법 중 하나가 GenericXmlApplicationContext이다.
DI(Dependency Injection)
다음의 세 가지 장난감이 있다고 하자.
- 배터리 일체형 -> 배터리가 떨어지면 장난감을 새로 구입해야 한다.
- 배터리 분리형 -> 배터리가 떨어지면 배터리만 교체하면 된다.
- 배터리 분리형 -> 배터리가 떨어지면 배터리만 교체하면 된다.
세 가지 장난감을 코드로 표현하자면 다음과 같다.
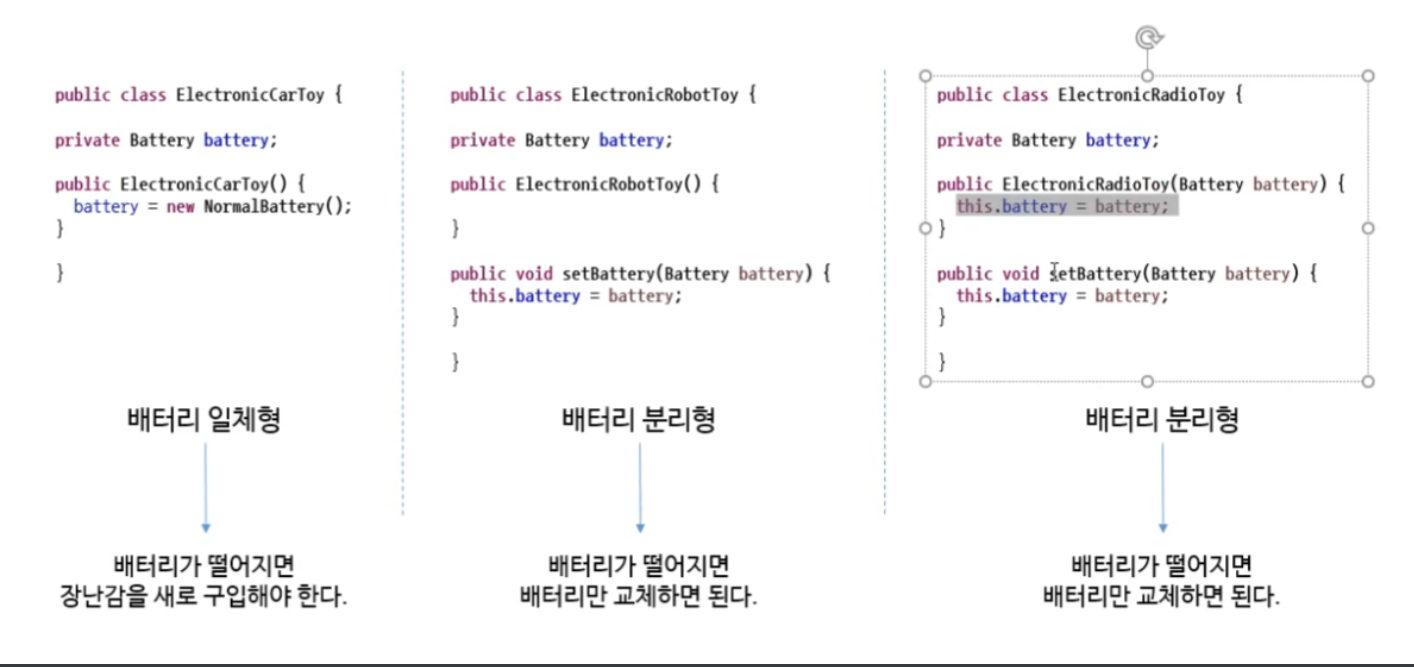
일단 셋 다 의존성을 가지는 것은 동일하다. 먼저 첫 번째 장난감의 경우 외부(예를 들어 main() 함수)에서 ElectronicCarToy를 호출하여 객체를 생성한다면 해당 객체는 여지없이 NormalBattery() 형 battery를 갖게 된다. 이런 경우 유연성이 없다고 말하며, 해당 객체는 현재 NormalBattery()에 의존성을 갖는다.
그러나 두 번째, 세 번째 장난감의 경우 setBattery를 호출하든 생성자를 호출할 때 battery를 주는 방식이든 간에 외부에서 특정 battery를 넣어준다. 이 경우 해당 객체는 외부로부터 의존성을 주입받게 되며 이것을 DI라고 한다. 두 번째는 setBattery를 통해 의존성을 주입받고, 세 번째 장난감은 메서드와 생성자 모두 의존성을 주입할 수 있는 여지를 열어두었다. 세 번째 같은 프로그래밍을 유연성 있는 프로그래밍이라고 부른다.
스프링에서는 다음 그림과 같은 구조를 갖는다.
잘 살펴보면 객체 두 개를 포함하고 있는 객체 하나가 보이는데, 그것은 위 사진의 두, 세 번째처럼 의존성을 주입받았기 때문에 그렇게 생겼다.

스프링에서 DI는 실제로 어떻게 활용될까?
스프링 프레임워크는 아래와 같은 구조를 갖는다.
Controller -> Service -> Service.impl -> DAO -> VO.
이 프레임워크 속에서 Service는 DAO 객체에 의존하게 되는데,
예를 들어 이렇게 생겼다 :
studentDao = new StudentDao(); aService = new StudentService(studentDao);
각각의 서비스는 Dao 객체를 주입해야(DI) 하며
이 경우 서비스는 Dao 객체에 의존 관계를 갖게 된다.
다양한 의존 객체 주입 방법
스프링에서는 생성자를 이용해서, setter를 이용해서, List 타입으로, Map타입으로 객체를 주입하는 방법들이 있다.
하나씩 차례대로 살펴보자.
- 생성자를 이용한 의존 객체 주입
주입하고자 하는 의존 객체를 하나 선언하여 id를 부여하고,javaxml <bean id="studentDao" class="somethign.dao.StudentDao"></bean> <bean id="registerService" class="something.service.StudentRegisterService"> <constructor-arg ref="studentDao"></constructor-arg> </bean>public StudentRegisterService(StudentDao studentDao) { this.studentDao = studentDao; }constructor-arg를 이용해서ref속성에 해당하는 id값만 넣어주면 알아서 의존성이 주입된다.
- setter를 이용한 의존 객체 주입
예를 들어 다음과 같은 setter 메서드가 있다고 하면, public void setJdbcUrl(String jdbcUrl) { this.jdbcUrl = jdbcUrl } public void setUserId(String userId) { this.userId = userId; }
xml에서는 다음과 같이 setter의 set + 첫 대문자 에서 set을 없애고,
첫 대문자를 소문자로 바꾸어서 property name을 주고 value로 인자값을 주면
setter가 동작하게 된다.
<bean id="something" class="something.someClassName">
    <!--
        setJdbcUrl -> jdbcUrl
        setUserId -> userId
    -->
    <property name="jdbcUrl" value="someValueString"/>
    <property name="userId" value="someName" />
</bean>
- List 타입 의존 객체 주입만약에 List와 같이 여러 가지 value를 넣어야 하는 상황에서는 어떻게 해야 할까?예제를 통해 이해해보자
// java에서 이렇게 표현했다면 public void setDevelopers(List<String> developers) { this.developers = developers; } //xml에서는 <property name="developers"> <list> <value>Prascicov</value> <value>Lee</value> <value>Ryan</value> <value>Choi</value> </list> </property>- 바로
<property>태그 안에<list>를 선언하고 그 안에 여러 가지<value>태그를 주는 것이다. - 바로 위에서 예로 든 setter 메서드를 이용한 의존 객체 주입 방식은 value가 하나만 들어가는 경우이다.
- Map타입 객체 주입
<property name="admins">
    <map>
        <entry>
            <key> <!-- 바로 아래 value가 key -->
                <value>sampleKey</value>
            </key> <!-- 바로 아래가 value -->
            <value>sampleValue</value>
        </entry>
        <entry>
            <key> <!-- 바로 아래 value가 key -->
                <value>sampleKey2</value>
            </key> <!-- 객체 자체를 넣는 경우. -->
            <ref bean="someObject" />
        </entry>
    </map>
</property>
Spring 설정 파일 분리하기
스프링의 applicationContext.xml 파일은 사용하다보면 매우 길어질 수 있다.
스프링에서는 이러한 상황에 대비해 아래 사진과 같이 파일을 분리할 수 있게 만들어놓았다.
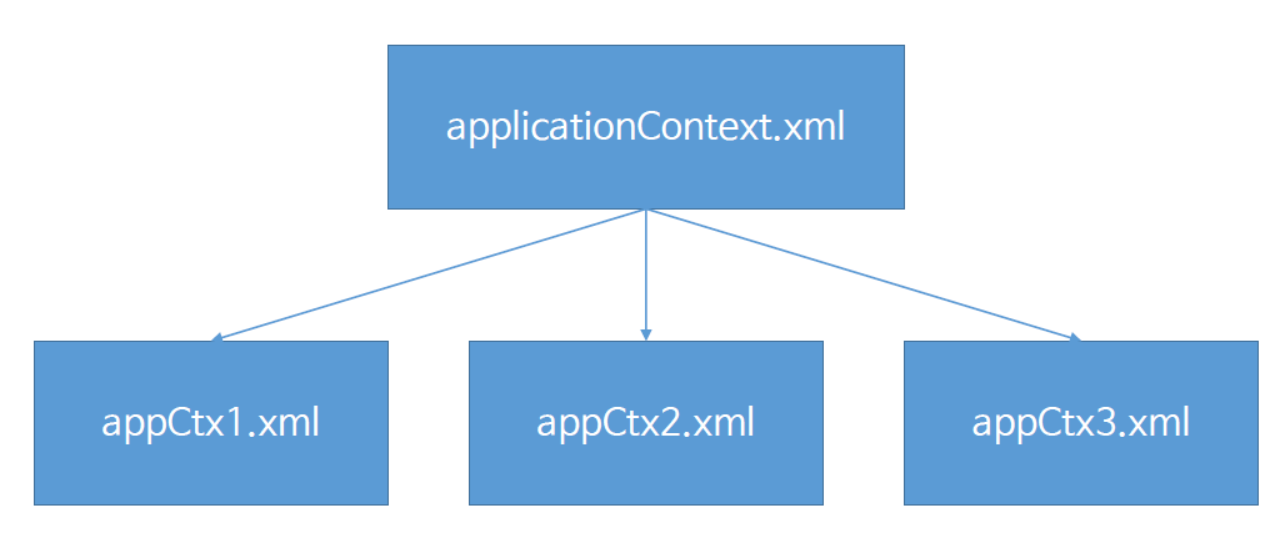
위를 실제 예제로 들어보자면
applicationContext.xml 파일이 다음과 같다고 했을 때,
<beans xmlns="http://maven.apache.org/POM/4.0.0" xmlns:xsi="http://www.w3.org/2001/XMLSchema-instance" xsi:schemaLocation="http://maven.apache.org/POM/4.0.0 https://maven.apache.org/xsd/maven-4.0.0.xsd">

    <bean id="bean1" class="someclasspath1"></bean1>
    <bean id="bean1-1" class="someclasspath11"></bean1>
    <bean id="bean1-2" class="someclasspath12"></bean1>

    <bean id="bean2" class="someclasspath2"></bean1>
    <bean id="bean2-1" class="someclasspath21"></bean1>
    <bean id="bean2-2" class="someclasspath22"></bean1>

    <bean id="bean3" class="someclasspath3"></bean1>
    <bean id="bean3-1" class="someclasspath31"></bean1>
    <bean id="bean3-2" class="someclasspath32"></bean1>

</beans>
이를 다음의 세 가지 파일로 나눌 수 있다.
appCtxt1.xml
<beans xmlns="http://maven.apache.org/POM/4.0.0" xmlns:xsi="http://www.w3.org/2001/XMLSchema-instance" xsi:schemaLocation="http://maven.apache.org/POM/4.0.0 https://maven.apache.org/xsd/maven-4.0.0.xsd">

    <bean id="bean1" class="someclasspath1"></bean1>
    <bean id="bean1-1" class="someclasspath11"></bean1>
    <bean id="bean1-2" class="someclasspath12"></bean1>

</beans>
appCtxt2.xml
<beans xmlns="http://maven.apache.org/POM/4.0.0" xmlns:xsi="http://www.w3.org/2001/XMLSchema-instance" xsi:schemaLocation="http://maven.apache.org/POM/4.0.0 https://maven.apache.org/xsd/maven-4.0.0.xsd">

    <bean id="bean2" class="someclasspath2"></bean1>
    <bean id="bean2-1" class="someclasspath21"></bean1>
    <bean id="bean2-2" class="someclasspath22"></bean1>

</beans>
appCtxt3.xml
<beans xmlns="http://maven.apache.org/POM/4.0.0" xmlns:xsi="http://www.w3.org/2001/XMLSchema-instance" xsi:schemaLocation="http://maven.apache.org/POM/4.0.0 https://maven.apache.org/xsd/maven-4.0.0.xsd">

    <bean id="bean3" class="someclasspath3"></bean1>
    <bean id="bean3-1" class="someclasspath31"></bean1>
    <bean id="bean3-2" class="someclasspath32"></bean1>

</beans>
beans 부분만 맞춰준다면 패턴을 파악하기 쉬웠을 것이다.
이렇게 나누면 이것을 활용할 때에는 다음과 같이 바꿔주면 된다.
// 전
GenericXmlApplicationContext ctx = new GenericXmlApplicationContext("classpath:applicationContext.xml");

// 후
String[] appCtxts = {"classpath:appCtxt1.xml", "classpath:appCtxt2.xml", "classpath:appCtxt3.xml"}
GenericXmlApplicationContext ctx = new GenericXmlApplicationContext(appCtxts);
또한 import를 사용하여 배열을 사용하지 않도록 만들 수도 있다.
예를 들어 appCtxt1.xml 에 다음과 같은 import 구문 두 줄을 추가해주면 사실상 appCtxt1.xml만 인식하게 만들어줘도 사용이 가능하다.
<beans xmlns="http://maven.apache.org/POM/4.0.0" xmlns:xsi="http://www.w3.org/2001/XMLSchema-instance" xsi:schemaLocation="http://maven.apache.org/POM/4.0.0 https://maven.apache.org/xsd/maven-4.0.0.xsd">

    <import resource="classpath:appCtxt2.xml"/>
    <import resource="classpath:appCtxt3.xml"/>


    <bean id="bean1" class="someclasspath1"></bean1>
    <bean id="bean1-1" class="someclasspath11"></bean1>
    <bean id="bean1-2" class="someclasspath12"></bean1>

</beans>
참고로 !
위에서는 예제를 1, 2, 3 이렇게 파일명으로 하여 들었지만,
실제로는 기능별로 이름을 짓고 기능별로 파일을 나눈다.
의존객체 자동 주입
의존객체 자동 주입과 @Autowired, @Resource에 대해 알아보자.
의존객체 자동 주입
정의: 스프링 설정 파일에서 의존 객체를 주입할 때 <constructor-arg> 또는 <property> 태그로 의존 대상 객체를 명시하지 않아도 스프링 컨테이너가 자동으로 필요한 의존 대상 객체를 찾아서 의존 대상 객체가 필요한 객체에 주입해주는 기능이다.
구현 방법은 @Autowired와 @Resource 어노테이션을 이용해서 쉽게 구현할 수 있다.
@Autowired
주입하려고 하는 객체의 타입이 일치하는 객체를 자동으로 주입한다.
예를 들어 여러 개의 Bean을 담고 있는 Spring Container로부터 어떤 Bean을 가져와야 하는 상황에서,
@Autowired 어노테이션을 붙이면 해당 객체와 타입이 일치하는 bean을 알아서 꺼내온다는 것이다.
이것이 활용되는 때를 예를 들어 설명해보겠다.
지금까지 배운 학습 내용에 따르면 우리는 main 메서드에서 applicationContext를 연결하고,
applicationContext.xml 파일에 의존관계를 명시하고 의존성을 주입해야 했다.
<bean id="wordDao" class="com.word.dao.WordDao" />

<bean id="registerService" class="com.word.service.WordRegisterService">
    <!-- 원래는 아래와 같이 wordDao에 대한 의존성을 직접 주입해주었다. -->
    <constructor-arg ref="wordDao"/>
</bean>
그러나 @Autowired를 이용하면 위와 같이 명시적으로 wordDao를 주입할 필요가 없어진다.
다음 자바 파일을 한번 보자.
package com.word.service;

import com.word.WordSet;
import com.word.dao.WordDao;

public class WordRegisterService {

    private WordDao wordDao;

    @Autowired
    public WordRegisterService(WordDao wordDao) {
        this.wordDao = wordDao;
    }

...

}
위의 자바 파일에서는 생성자가 WordDao 객체에 대한 의존성을 갖고 있다.
이 경우 원래대로라면 constructor-arg 를 xml 파일에 써줌으로써 의존성을 넣어주어야 하지만,
@Autowired 어노테이션으로 해당 문제를 해결하는 것이다.
하지만 autowired와 같은 기능을 이용하려면 xml파일에 네 줄 정도를 추가해야 한다.
기존의 xml파일에서 xmlns:context="http://www.springframework.org/schema/context"와,
<context:annotatoin-config /> 를 추가하면 된다.
(외울 필요 없고 그냥 한 번만 설정하고 나면 복사해서 붙여쓰면 된다.)
아래는 그 예.
<?xml version="1.0" encoding="UTF-8"?>

<beans xmlns="http://www.springframework.org/schema/beans"
    xmlns:context="http://www.springframework.org/schema/context" <!-- 여기 -->
    xmlns:xsi="http://www.w3.org/2001/XMLSchema-instance"
    xsi:schemaLocation="http://www.springframework.org/schema/beans
         http://www.springframework.org/schema/beans/spring-beans.xsd
         http://www.springframework.org/schema/context  <!-- 여기 -->
         http://www.springframework.org/schema/context/spring-context.xsd">  <!-- 여기 -->

    <context:annotation-config /> <!-- 여기 -->

    <bean id="wordDao" class="com.word.dao.WordDao" >
    </bean>

    <bean id="registerService" class="com.word.service.WordRegisterService" />


</beans>
참고로 생성자를 제외하고 메서드나 멤버 변수에 @Autowired 를 사용하고자 한다면,
해당 클래스는 default생성자(인자로 아무것도 받지 않는, 가장 기본적인 형태의 생성자) 메서드를 반드시 써주어야 한다.
Resource
Resource는 기본적으로 Autowired와 동일하다고 보면 되는데, 차이점은
Autowired가 객체의 타입이 같은 경우 자동으로 DI를 한다면,
Resource는 객체의 이름이 같은 경우 자동으로 DI를 한다.
예를 들어
xml파일에서 bean id="wordDao"이면
java 클래스에서
@Resource
private WordDao wordDao;
라는 프로퍼티에 대해 wordDao가 겹치므로 해당 부분에 의존성을 주입하는 것이다.
한 가지 더 차이가 나는 부분은
Autowired가 생성자, 멤버 변수(프로퍼티), 메서드 모두에 쓰일 수 있는 반면
Resource는 생성자에는 쓸 수 없다는 점.
겹치는 Bean 객체가 Container에 여러 개 있는 경우
@Autowired는 데이터의 타입을 인식해서 알아서 의존성을 주입한다고 했다.
그런데 데이터의 타입이 겹치는 Bean이 두 개 이상 있는 경우라면 Spring에서는 어떤 Bean을 주입해야 하는지 모를 것이다.
이 경우 스프링으로 하여금 의존객체 선택 을 하도록 만드는 법을 배워보자.
@Qualifier
위와 같은 상황에서는 Qualifier 어노테이션을 이용하면 문제가 해결된다.
아래 예제에서 WordDao 타입의 bean은 총 세 개나 있지만,
qualifier를 매치시키줌으로써 어떤 wordDao bean을 써야 하는지에 대해 스프링에게 인식시키고 있다.
<bean id="wordDao" class="com.word.dao.WordDao">
    <qualifier value="usedDao"/>
</bean>
<bean id="wordDao2" class="com.word.dao.WordDao"/>
<bean id="wordDao3" class="com.word.dao.WordDao"/>
<!-- 위 세 개의 데이터 타입은 모두 WordDao이다. -->
@Autowired
@Qualifier("usedDao")
private WordDao wordDao;
참고로 Qualifer로 어떤 bean을 써야하는지 매치시켜주지 않는다면
프로그램은 Exception을 발생시킨다.
생명주기(Life Cycle)
지금까지 스프링 컨테이너와 빈 객체에 대해 배웠다.
이제 그것이 생성되고 동작하고, 소멸되는 시점에 대해 배울 차례이다.
어노테이션을 이용한 스프링 설정
지금까지 배웠던 스프링 설정은 모두 xml 파일을 이용했다.
이번에는 그 방법을 바꿔서 어노테이션을 이용해 컨테이너를 생성하고 관리해보도록 하자.
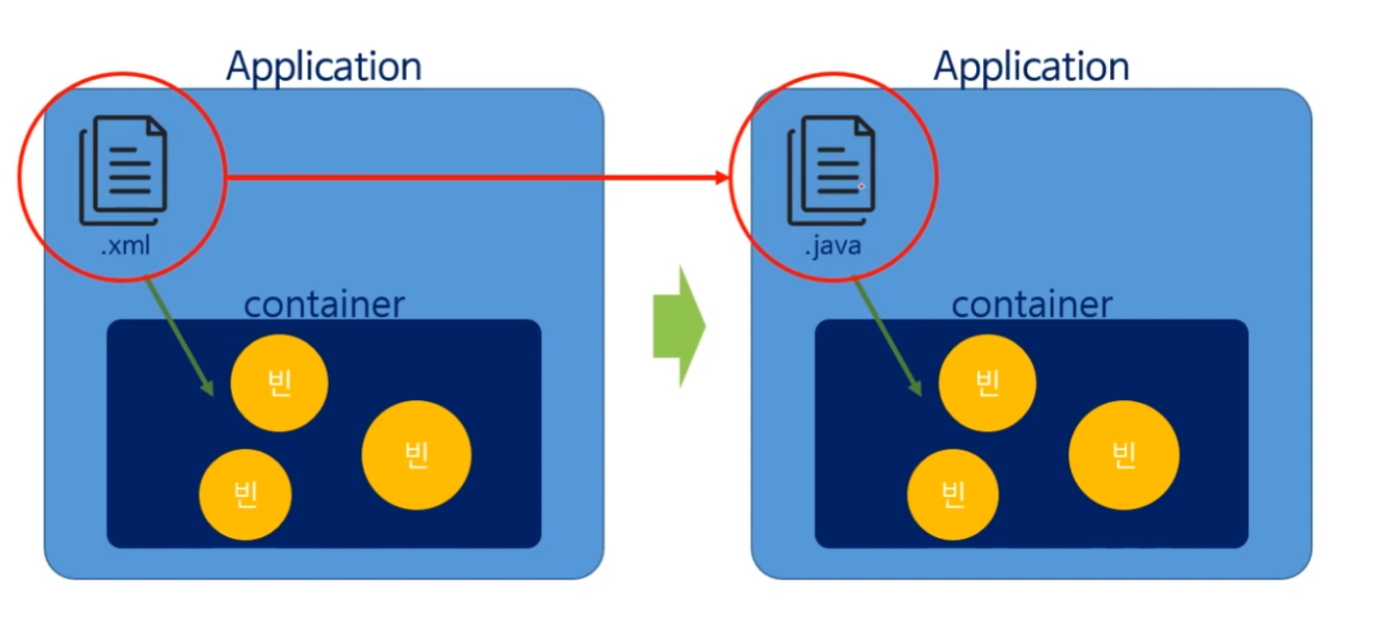
위 작업을 하기 위해 아래 이미지의 오른쪽 파일(xml)을 왼쪽(java)으로 옮겨보도록 하자.
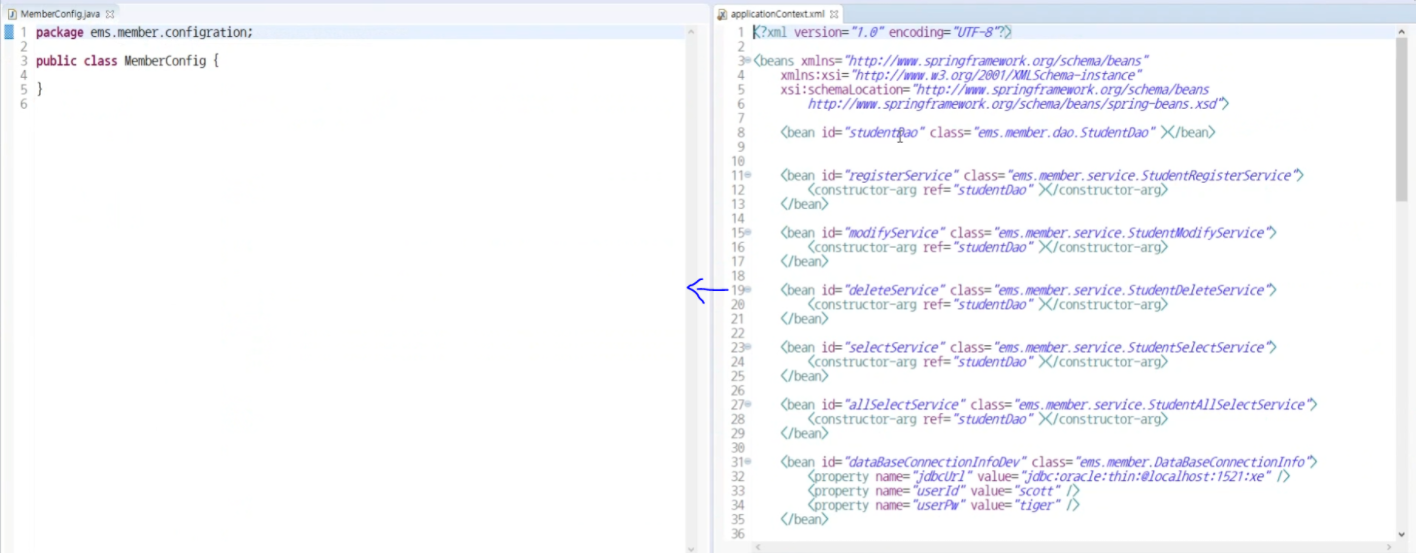
먼저 MemberConfig 클래스가 스프링 xml 파일을 대신해서 container를 생성할 수 있습니다. 라고 명시를 해주어야 하는데,
이것을 위해서 쓰는 것이 @Configuration이다.

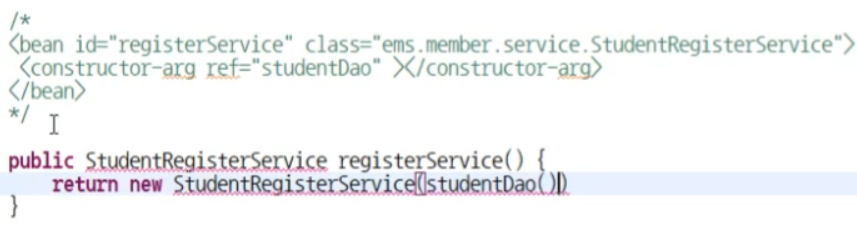
아래는 xml에서 주석 속 한 줄처럼 쓰이던 것이
자바코드로 어떻게 쓰이는지 예를 들은 것이다.
반환형을 명시하고, id와 메서드 이름을 맞추어 준다.
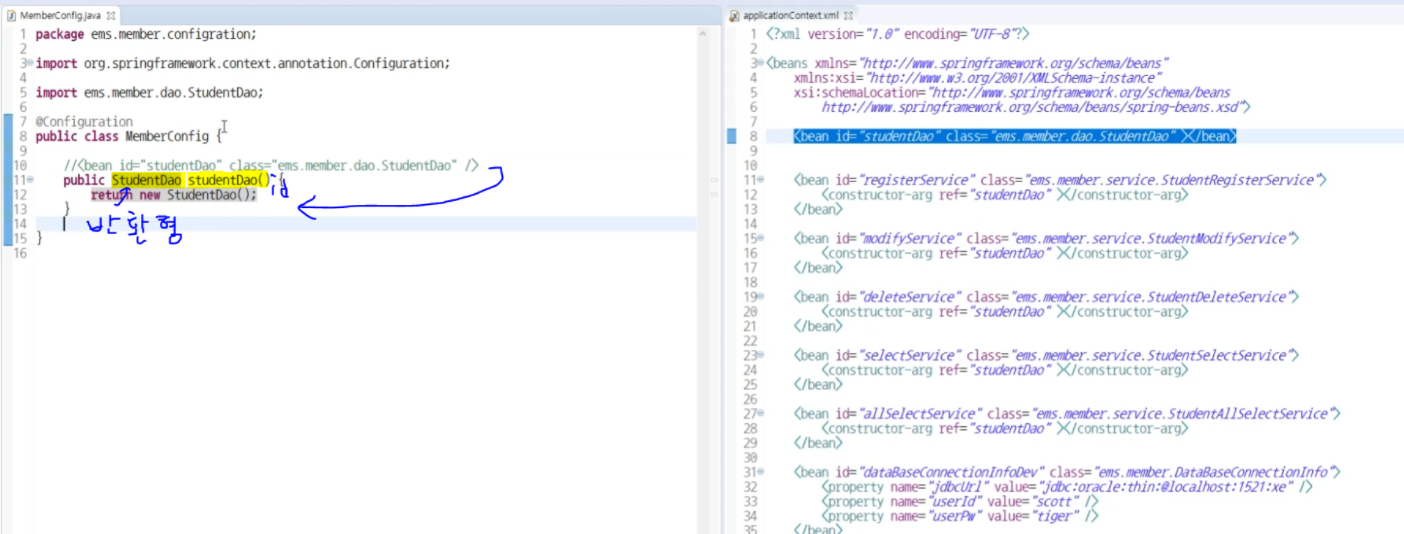
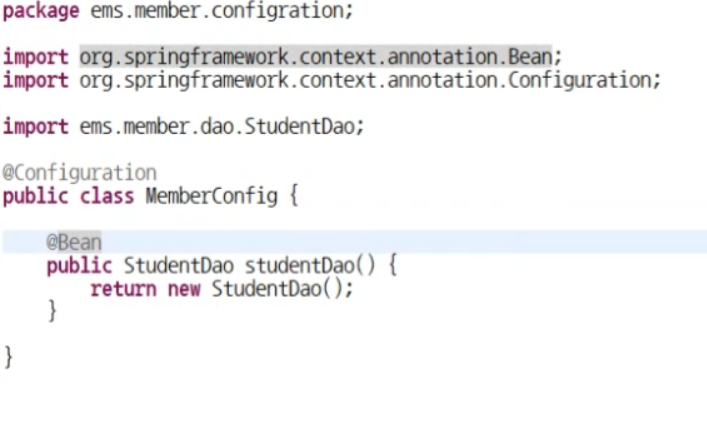
그리고 StudentDao studentDao() 메서드를 가지고 Bean 객체를 만들어 줄 것이라는 것을 명시해주기 위해
@Bean 어노테이션을 위해 하나 만들어준다.
constructor-arg 를 필요로 하는 경우는 아래와 같이 만든다.
(그림에는 없지만 @Bean도 붙여주자.)
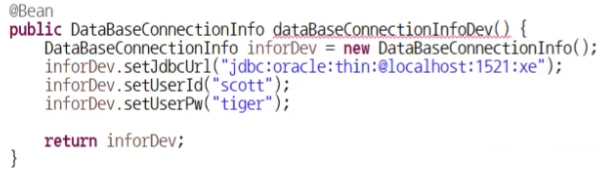
만약 아래와 같이 properties를 갖는 bean은 어떻게 처리하면 될까?

이 경우 반환형의 객체를 생성하고 객체의 setter를 이용해 값을 대입한다.
코드는 아래와 같다:
List 타입의 경우는 어떨까?
예를 들어 xml 파일에 다음과 같이 정의되어 있는 경우
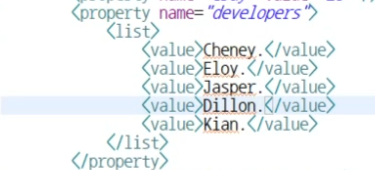
java코드로는 다음과 같이 설정할 수 있을 것이다.
@Bean
public EMSInfomationService informationService() {
    EMSInformationService info = new EMSInformationService();

    ArrayList<String> developers = new ArrayList<String>();
    developers.add("Cheney.");
    developers.add("Eloy.");
    developers.add("Jasper.");
    developers.add("Dillon.");
    developers.add("Kian.");

    info.setDevelopers(developers);

    return info;
}
아래와 같은 Map 구조 또한 자바로 처리가 가능하다.
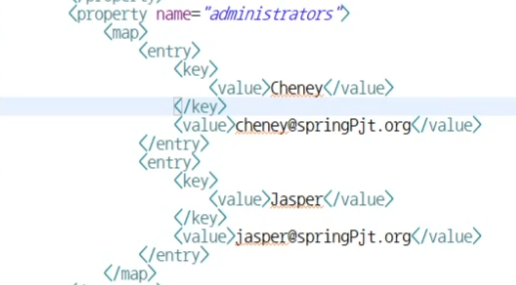
java
@Bean
public EMSInfomationService informationService() {
    EMSInformationService info = new EMSInformationService();

    Map<String, String> administrators = new HashMap<String, String>();
    administrators.put("Cheney", "cheney@springPjt.org");
    administrators.put("Jasper", "jasper@springPjt.org");
    info.setAdministrators(administrators);

    return info;
}
적용
어노테이션을 이용한 Spring 설정하기를 적용해보자.
XML을 이용하던 방식에서는 아래와 같은 방법으로 Container를 생성하였다.
GenericXmlApplicationContext ctx = new GenericXmlApplicationContext("classpath:applicationContext.xml");
반대로 java 클래스 파일을 이용한다면 아래와 같이 적용할 수 있을 것이다:
(우리가 여태껏 작성한 java class의 이름을 MemberConfig라고 하자.)
// GenericXmlApplicationContext ctx = new GenericXmlApplicationContext("classpath:applicationContext.xml");

AnnotationConfigurationApplicationContext ctx
    = new AnnotationConfigurationApplicationContext(MemberConfig.class)
Spring MVC 프레임워크 설계 구조
우리가 자주 쓰는 Spring MVC 프레임워크는 다음의 구조를 기본적으로 갖는다.
처음 보는 용어들이 많고 자주 접하겠지만 배울 기회는 이번밖에 없을 테니 잘 알아두자.
하나씩 설명하겠다.
(참고로 아래 그림에서 DispatcherServlet, HandlerMapping, HandlerAdapter, ViewResolver 모두 설정만 해주면 따로 건들 필요 없다.)

먼저 클라이언트(브라우저)는 우리에게 특정 페이지로 연결하라고 요청을 한다.
이것을 가장 먼저 받는 것은 DispatcherServlet이 된다.
DispatcherServlet은 요청을 받으면 해당 요청을 가장 먼저 HandlerMapping으로 던진다.
HandlerMapping은 그림 속 오른쪽 맨 위에 보이는 Controller로부터 가장 적합한 controller를 선택한다.
예를 들어 신문 서비스를 우리가 한다고 치면
경제, 정치, 사회, 연예, 날씨 등등의 페이지들을 우리가 보유하고 있을 것이고,
브라우저(클라이언트)가 날씨 페이지를 달라고 요청을 하면 Dispatcher Servlet은 HandlerMapping에게 요청을 보내서
가장 적절한 컨트롤러, 즉 날씨 컨트롤러를 찾아내도록 하는 것이다.
HandlerMapping이 가장 적절한 controller 를 찾게 되면
Dispatcher Servlet은 Handler Adapter에게 다시 그 요청을 보내서
HandlerMapping이 찾아낸 컨트롤러에서 가장 적합한 메서드를 찾아내서
해당 메서드를 실행한 결과를 Dispatcher Servlet에게 전달한다.
이렇게 HandlerAdpater가 찾아온 결과를 가지고 Dispatcher Servlet은
ViewResolver에게 가서 가장 적합한 JSP를 찾아오도록 한다.
ViewResolver가 가장 적합한 JSP를 찾으면,
해당 View를 응답으로 하여 Client에게 보낸다.
DispatcherServlet
DispatcherServlet은 사거리의 신호등과 같다.
해당 서블릿은 web.xml파일로부터 설정을 읽어들이는데, 아래 이미지가 그 예시이다.

위 사진에서 아래 코드 부분은 브라우저 주소창에 / 이렇게 들어오는 것에 대해 appServlet을 찾아 dispatcherServlet으로 사용하겠다는 말이고,
<servlet-mapping>
<servlet-name>appServlet</servlet-name>
<url-pattern>/</url pattern>
</servlet-mapping>
아래 부분은 appServlet의 정보를 담고 있으며 해당 servlet의 설정 파일은 param value 부분인 servlet-context.xml에 담아두겠다는 말이다.
<servlet
<servlet-name>appServlet</servlet-name>
    <servlet-class>org.springframework.web.servlet.DispatcherServlet</servlet-class>
    <init param>
    <param name>contextConfigLocation</param name>
    <param value>/WEB-INF/spring/appServlet/servlet-context.xml</param value>
    </init param>
    <load on startup>1</load on startup>
</servlet>
DispatcherServlet 설정

방금까지 위 이미지에서 왼쪽 방법에 대해 알아보았고, 오른쪽 방법은 servlet-context.xml이라는 파일을 초기화 파라미터로 지정하지 않았을 경우를 예로 든 것인데, appServlet-context.xml을 자동 생성하여 사용하게 된다. 다만 일반적으로는 왼쪽 방식을 사용한다.
ViewResolver에서는 InternalResourceViewResolver 에 대한 설정에 의해
controller가 리턴한 값의 앞 부분에 prefix value를 붙이고 뒷 부분에 suffix를 붙여서 해당 jsp 파일을 찾도록 만든다.
(잘 모르겠다면 이후 설명할 예제를 보면서 이해해도 좋다.)

모든 글은
자바 스프링 프레임워크( - 신입 프로그래머를 위한 강좌) (https://www.inflearn.com/course/%EC%8A%A4%ED%94%84%EB%A7%81-%ED%94%84%EB%A0%88%EC%9E%84%EC%9B%8C%ED%81%AC_renew/dashboard) 에서 참고하였습니다.
현재 편에서는 Spring MVC - 2 까지 이수한 후 정리한 글입니다.


최근댓글