xcode에서 위치 정보 얻어오기.
swift에서는 위치 정보를 받아오기 위해 얻어와도 되는지 물어보고, 물어본 상태에 따라 로직을 구현해 나가는 과정이 필요하다.
한번이라도 해봤으면 어떤 느낌인지 잘 알겠지만 그것을 전부 기억하고 있기에는 무리인 것 같아서 순서대로 설명해보겠다.
0. import CoreLocation
가장 먼저 CoreLocation 을 import해주어야 한다.
1. locationManager 선언하기.
위치 정보를 가져오기 위해 가정 먼저 해야할 것은 class 내부에 CLLocationManager형식의 변수를 하나 선언하는 것이다.
예를 들어 이렇게 : var locationManager: CLLocationManager!
2. viewDidLoad()에서 CLLocationManager 객체 생성하기.
CLLocationManager는 선언만 해서는 사용할 수 없다.
사용을 위해서는 viewDidLoad내에 객체 생성 코드를 입력해주자.
locationManager = CLLocationManager()
3. delegate설정하기.
(extension을 이용해) CLLocationManagerDelegate를 구현하게끔 하자.
ViewController: 옆에 CLLocationManagerDelegate를 적으면 된다.
4. delegate = self
viewDidLoad()에 delegate를 self로 선언해주자. 다음과 같이.
locationManager.delegate = self
5. 위치 가져오기
locationManager.delegate = self 부분 아래에 위치정보를 가져오는 코드를 적자. 코드는 아래와 같다.
self.locationManager.requestWhenInUseAuthorization()
6. 상태 받기
(CLLocationManagerDelegate를 구현하는 곳에서) func locationManager(_ manager: CLLocationManager, didChangeAuthorizationStatus status: CLAuthorizationStatus) 를 구현해주자. 여기서 우리는 switch-case문을 통해 GPS 권한 설정 여부에 따라 로직을 나누어볼 것이다. 예를 들면 다음과 같이.
   func locationManager(_ manager: CLLocationManager, didChangeAuthorization status: CLAuthorizationStatus) {
        //location5
        switch status {
        case .authorizedAlways, .authorizedWhenInUse:
            print("GPS 권한 설정됨")
            self.locationManager.startUpdatingLocation() // 중요!
        case .restricted, .notDetermined:
            print("GPS 권한 설정되지 않음")
            getLocationUsagePermission()
        case .denied:
            print("GPS 권한 요청 거부됨")
            getLocationUsagePermission()
        default:
            print("GPS: Default")
        }
    }
가장 중요한 !!
7. 아래 동그라미 친 부분을 Info.plist에서 설정해주자.
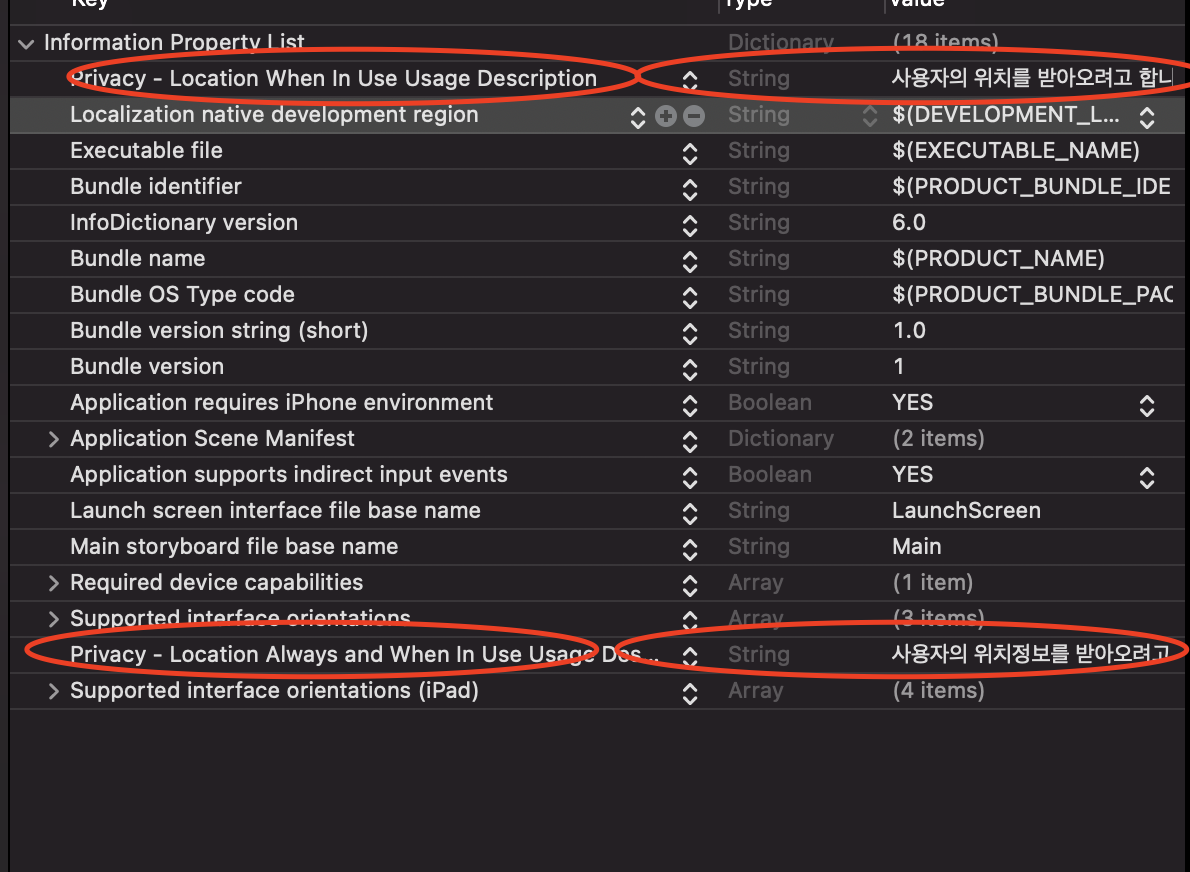
여기까지 했다면 무리없이 위치 정보를 받아올 수 있을 것이다. (찡긋)
전체코드
import UIKit
import NMapsMap

class ViewController: UIViewController {

    var locationManager: CLLocationManager! // location1

    @IBOutlet weak var naverMapView: NMFNaverMapView!
    let coord = NMGLatLng(lat: 37.4889112, lng:127.0657742)

    override func viewDidLoad() {
        super.viewDidLoad()

        locationManager = CLLocationManager() // location2
        locationManager.delegate = self // location3
        getLocationUsagePermission()

        naverMapView.showCompass = true // 나침반 모양
        naverMapView.showZoomControls = true // +, - 버튼
        naverMapView.showLocationButton = true //동그라미 버튼

    }


}

extension ViewController: CLLocationManagerDelegate {

    func getLocationUsagePermission() {
        //location4
        self.locationManager.requestWhenInUseAuthorization()

    }

    func locationManager(_ manager: CLLocationManager, didChangeAuthorization status: CLAuthorizationStatus) {
        //location5
        switch status {
        case .authorizedAlways, .authorizedWhenInUse:
            print("GPS 권한 설정됨")
        case .restricted, .notDetermined:
            print("GPS 권한 설정되지 않음")
            getLocationUsagePermission()
        case .denied:
            print("GPS 권한 요청 거부됨")
            getLocationUsagePermission()
        default:
            print("GPS: Default")
        }
    }
}
+) locationManager를 선언함과 동시에 CLLocationManager객체 생성하기
lazy var locationManager: CLLocationManager = {
        let manager = CLLocationManager()
        // desiredAccuracy는 위치의 정확도를 설정함.
        // 높으면 배터리 많이 닳음.
        manager.desiredAccuracy = kCLLocationAccuracyBest
        manager.delegate = self
        return manager
 }()
+) 위도 경도 정보 얻기
func locationManager(_ manager: CLLocationManager, didUpdateLocations locations: [CLLocation]) {

        // the most recent location update is at the end of the array.
        let location: CLLocation = locations[locations.count - 1]
        let longtitude: CLLocationDegrees = location.coordinate.longitude
        let latitude:CLLocationDegrees = location.coordinate.latitude

...
}'iOS::스위프트(swift) > just swift' 카테고리의 다른 글
| Swift/iOS MapKit 으로 지도에 이동 기록 나타내기(with LocalDB Realm) (1) | 2021.05.07 |
|---|---|
| Swift/iOS Naver API 받아 써보기(feat. Nmapsmap 오류 해결) (0) | 2021.05.03 |
| ios/swift 이미지뷰에 앨범 이미지 넣기(이미지 뷰를 탭하여) (0) | 2021.03.11 |
| CocoaPods 설명, 설치법, 사용법 (0) | 2021.02.17 |
| Swift Textfield didChange 텍스트필드 값 변경 감지 (0) | 2021.02.11 |


최근댓글